In Windows 8, Windows 7, Windows Vista, and Windows 10, TrustedInstaller has a built-in user account. This user account contains various system files, including your program file folder, Windows folder, and even an old Windows folder when you updated one version of Windows to another. “Windows Module Installer” includes TrustedInstaller.exe, an important application.
Its sole purpose is to test new Operating System upgrades. It allows you to install, modify, and uninstall Windows updates and optional components. The executable file is under the C: \Windows subfolder – mostly C:\Windows\servicing\. If you disable the TrustedInstaller.exe process, installing and uninstalling Windows updates on your computer may fail.
What is TrustedInstaller.exe and its Advantages?
Microsoft Incorporation designed and developed a simple application, “TrustedInstaller.exe.” The Windows Modules Installer service, which comes with Windows, uses the TrustedInstaller user account. Because the Service is responsible for installing, manipulating, and uninstalling Windows Updates and other optional Windows components, it has complete control over them.
Is TrustedInstaller a Virus/Malware?
The service is often misread as a virus or malware, although TrustedInstaller is not a virus. However, since TrustedInstaller.exe often consumes a large amount of disk and CPU resources, it is likely that it may have been damaged and attacked by viruses or threats to some users. As a result, it tries to do whatever it wants on your computer because there are no restrictions. Alternatively, you may find that TrustedInstaller is using a large amount of CPU on your computer after upgrading to Windows. This procedure is responsible for a significant slowdown in the overall performance of your computer as well as a number of common glitches.
In this case, it is important to address various issues with TrustedInstaller.exe, such as disabling TrustedInstaller. You may also need to delete or rename TrustedInstaller protected files, but to do so, you will need to remove them from the TrustedInstaller user account. Now we will see how to disable TrustedInstaller, which is the first issue. Later, we’ll go over all the issues with TrustedInstaller, including why you would like to change the ownership of the file from TrustedInstaller to your regular administrator account.
Method to Disable TrustedInstaller?
It is possible that attempting to disable the Trusted Installer software from Windows will resolve the TrustedInstaller.exe high CPU or trusted permission difficulties.
Step 1: Open the “Run box” by pressing Windows + R, and then type “msconfig” or “services.msc” (for Windows 10) in the box. Then press OK to enter the “Services panel.”
Step 2: Locate the “Windows Module Installer” service in the ‘Services window’ and right-click it to view its “Properties.”
Step 3: Find the “Startup” type in the ‘Properties’ window and change it to Manual.
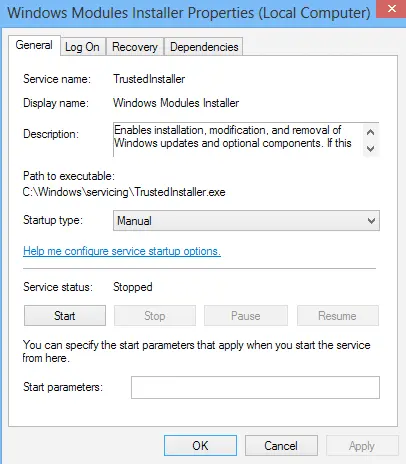
Step 4: Now, hit the Disable, tap Apply and OK to deactivate it here.
As a result, the next time you start your PC, this trusted installer will not start immediately and will consume a lot of CPU and memory. You can also choose to use SFC to troubleshoot trusted installers. Just type sfc/scannow at the command prompt. Corruption in system files will then be removed. In addition to the overuse of the CPU due to the TrustedInstaller.exe issue, you may be hoping to get permission to edit system files through TrustedInstaller.
Why Does “You Require Permission from TrustedInstaller” Error Message Show Up?
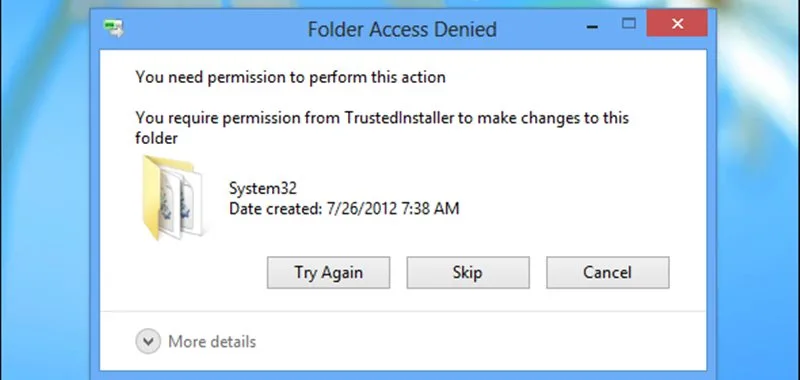
The main reason you encounter a TrustedInstaller error message is that you are trying to change or delete a file belonging to a TrustedInstaller account. If you really need to delete some of the files that this account protects, you will not be able to do so unless the file is under the control of TrustedInstaller. If you try to edit or delete the file, you will get the following message:
“You do not have permission to perform this operation, or you need permission from TrustedInstaller to perform this operation.”
This could be the result of malware or virus files that are hidden as Windows processes, installer services, or important system files in order to gain unauthorized access to secure Windows directories and steal important files or folders.
Method to Fix the “You Require Permission from TrustedInstaller” Error Message
The only way to get rid of this error notice is for the administrator or user who wants to change the ownership of all TrustedInstaller files. On a Windows computer, there are only three options, which are shown below:
Option 1: Use the Advanced Permissions of File Explorer to transfer ownership of files
Option 2: Changing Permissions with the Command Prompt Tool
Option 3: Create a Script to take Command of the file
Method for Taking Ownership and Permissions to Delete, Edit or Rename TrustedInstaller Protected Files
While the TrustedInstaller account controls your system files, you can reclaim ownership if you want to make changes to them. Keep in mind that modules often prevent you from causing problems. For example, if you rename the “System32” folder, your Operating System will stop running. To prevent damage, TrustedInstaller prevents you from renaming this folder.
Note: Follow these instructions only if you are an experienced user who understands what you are doing. Before changing any system folder, we strongly recommend creating a system restore point and backing up important files.
Step 1: Open the ”File Explorer.” This can be done by clicking on the Explorer icon in your taskbar or by pressing the Windows + E keys on your keyboard.
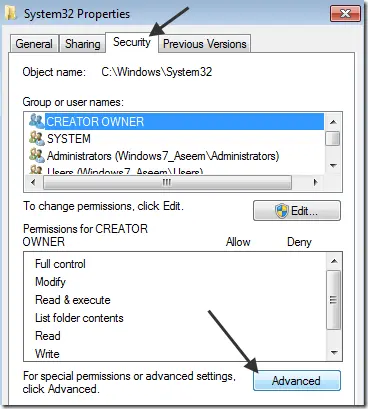
Step 2: Locate the file or folder you want to take ownership of. Right-click on it, and then choose ”Properties” from the context menu.
Step 3: A new window will appear. Here, switch to the ”Security” tab, and then click on the “Advanced” button to access special permission and settings.
Step 4: Click on the ”Change” link next to the current owner of the folder or file, which should be TrustedInstaller. You’ll need administrative permissions to be able to do this.
Step 5: Type Administrators in the Enter the object name to select field, then click on the ”Check Names” button. The system should automatically input the full name. When done, click the OK button.
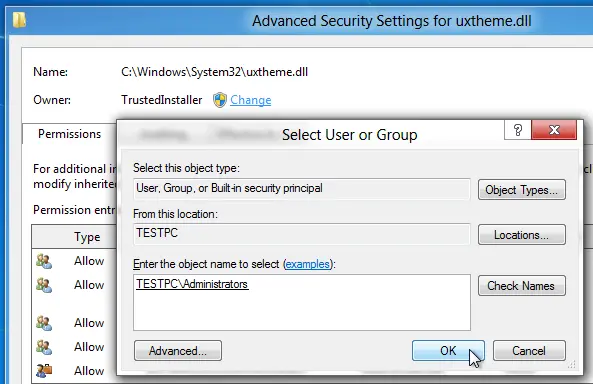
Step 6: Make sure to place a checkmark next to the Replace owner on the subcontainers and objects option. This is going to apply the modification to all files and folders within the main one.
Step 7: Afterward, choose the “Select a User/Group” and click on the Edit button. A new window should open up.
Step 8: Click on ”Select a Principal” and choose the ”Administrators Group” as you did in Step 5. Place a checkmark next to the Full Control option to grant administrator accounts full permissions to the folder and its files.
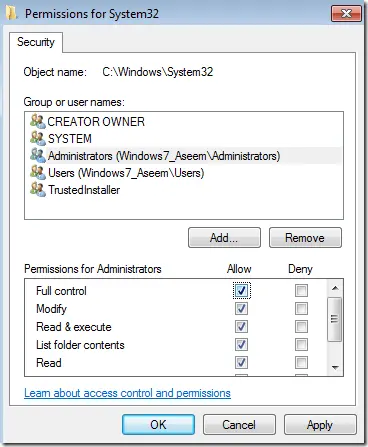
Step 9: Click the OK button twice to save your changes and exit the advanced properties window. Now, you should be able to work with the folder and/or files you previously couldn’t delete or modify.
Repeat these steps for any more folders and/or files you want to modify. You should be able to edit, rename and delete system files now. If you feel that you often need to repeat these steps, we highly recommend looking into downloading a .reg file that adds the “Take Ownership” option to your right-click context menu.
Final Words
Microsoft is constantly concerned about the safety of Windows users. In particular, they are working on a better firewall and safety shield to help you avoid unauthorized access. All system files and folders are password-protected, ensuring that no one can delete or edit them without the administrator’s permission. However, there are times when we need to rename TrustedInstaller’s protected files or take ownership of the saved system files. In such cases, you will need to read a detailed guide on Windows security, like this one. So, read this guide and make it possible to have complete command over the system and easily rename your file.
