MediaTek USB VCOM drivers allow your computer to connect to and communicate with a smartphone powered by MediaTek via USB. The prime function of these drivers is to detect the device pre-Loader on your PC Windows so that you can use the SP Flash tool to load the USB connection. To get a better understanding of this, let’s see what a “pre-Loader” is.
The device driver runs the boot loader on all Android devices and explains how to boot the Android System (also called “boot process”). When it comes to MTK Android smartphones, it is known as “pre-Loader,” a custom loader developed by MediaTek.
Users of Mediatek smartphones often find a quick and easy solution to gain root access and install many custom ROMs on their handsets. SP Flash Tool is ideal for this, but it requires you to have the latest MediaTek drivers installed on your computer.
Mediatek MT65XX USB VCOM Drivers
MediaTek MT65xx pre-Loader USB drivers help you load different files on your smartphone. Custom ROMs and root packages, in particular, can be installed using the SP Flash tool. It also enables proper data transfer between connected devices. In a nutshell, if your smartphone runs on MediaTek, you should install VCOM drivers. For all MediaTek smartphones, this is an essential tool.
All Android devices with MediaTek MT65xx chipset can use these drivers. Many users have stated that they cannot install them for their MediaTek device. The instructions to install VCOM Drivers in Windows 8 and 8.1 can be found here. To get the updated Mediatek drivers for your computer, follow the step-by-step instructions below.
Steps for Installing USB VCOM Drivers in Windows 8 and 8.1
There are mainly two steps followed in the installation process of MediaTek MT65xx USB VCOM drivers. These are given below.
Step 1: Disable Driver Signature Enforcement
Go to Computer Settings from the start menu, select the option “Update and Recovery” and click on “Recovery.”
Under “Advanced Startup” click on “Restart” Now. Your computer will reboot.
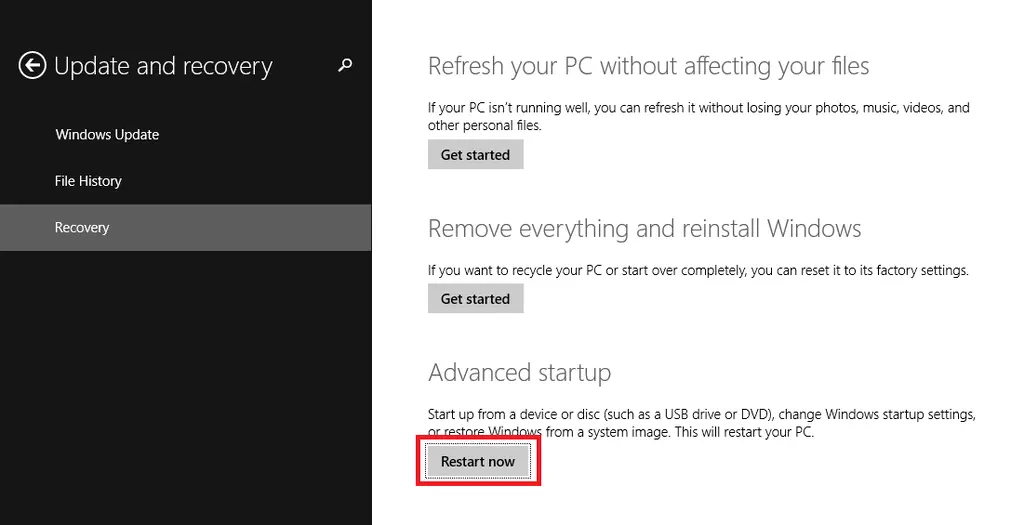
Refresh your PC and use advanced tools, Click on “Troubleshoot” in “Advanced Options” from “Startup Settings” (change windows startup behavior) and Restart.
Your computer will now restart and show a blue screen with ten options. Disable driver signature enforcement by pressing 7 or F7 on your keyboard.
After the computer restarts, you can install the Mediatek Preloader USB VCOM driver for Windows 7/8/8.1/10.
Step 2: Install SP Flash Tool / Mediatek Preloader USB VCOM Driver
Download and install MediaTek USB VCOM Drivers for Windows 8, Windows 8.1, and Windows 10.
Go to “Device Manager Action” and click “Add Legacy Hardware.” Click “Next” after selecting Install hardware from a list you want to choose. Then, from the drop-down box, choose Show All Devices.
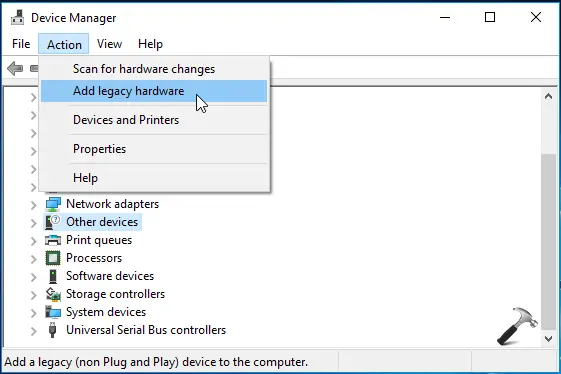
Click “Have Disk” in the lower right corner of the next screen, then move to the drivers you downloaded to your PC. The necessary drivers can be found in the Windows 7 folder.
Choose usb2ser Win764.inf for x64 PCs and usb2ser Win7.inf for x86 PC, then click “OK.” After the driver has loaded, go to the next page and select MediaTek Pre-Loader USB VCOM Port, then click “Next.”
An error can appear, indicating that Windows cannot validate the publisher of this driver program. Select “Install” this driver anyway, and the MediaTek Pre-Loader driver will be installed.
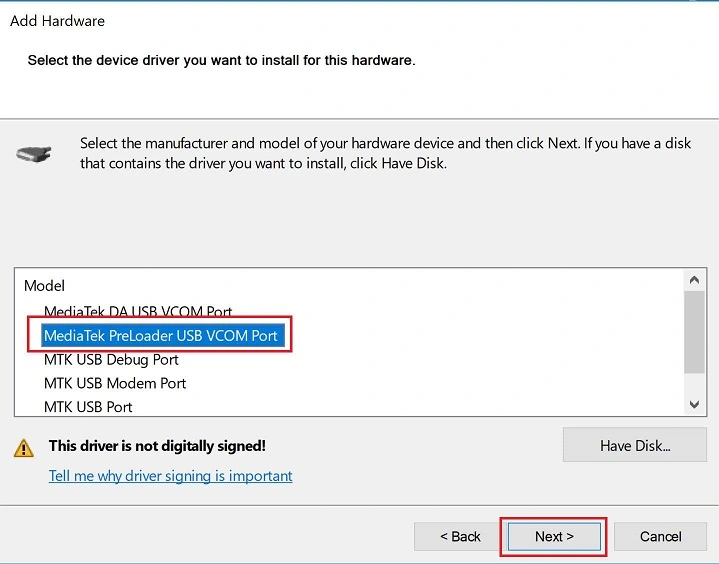
You may now run SP Flash Tool to load your MTK-based Android phone with ease.
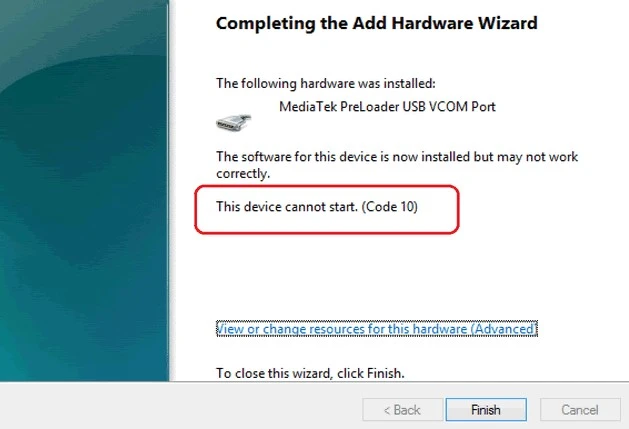
In some cases, Error “Code 10 – This device cannot be started” may appear after successful installation. In Device Manager, there is a yellow triangle beside the MediaTek driver. Just ignore them and start the SP Flash tool, which will work efficiently.
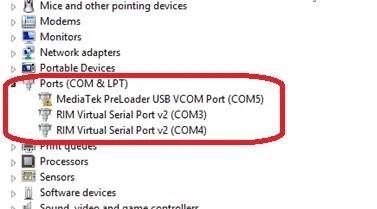
Click on Finish to complete the Installation process of MediaTek MT65xx USB VCOM drivers.
Your MediaTek MT65xx USB VCOM drivers are installed successfully. The above mentioned guide will surely help you in easy installation of MediaTek MT65xx USB VCOM.


